


GLOW GUIDE
PRE-GLOW
BOOKING
ARRIVAL
TAN TIME
POST-GLOW

BUFF + POLISH
Exfoliate 24 hours before your tan to remove dead skin, old tan, or any lingering mistakes. Skip oily scrubs — they can block absorption and leave uneven patches.
LOTION OFF!
Moisturiser might be your bestie every other day, but not today. Ditch the lotion before your session so your skin absorbs that bronzed goodness evenly.
BARE-FACED
Remove makeup to avoid patchiness and give your face a flawless, even tan. Plus, with your post-tan glow, you may not need foundation for a few days — win, win!
Smooth Operator
Shave, wax, zap or pluck at least 24 hours before your tan. Hair removal too close to your session can leave your pores open, which may lead to a slightly uneven tan.
Perfume Pause
No perfume, no deodorant. The chemicals in these products can react with tanning formulas, leaving streaks or discolouration — A temporary sacrifice for a flawless glow!
Baggy Chic
Wear loose, breathable clothing that won’t cling or rub. Skip tight shoes too, thongs or slides are the way to go to avoid any awkward lines or pressure marks.
PRE-TAN CHECKLIST

01
DOWNLOAD
Download the Be Bronze 24/7 app on your phone.

02
EXPLORE
Register and explore our passes and plans.

03
BOOK
Easily schedule your tanning session 24/7.
TAP TO TAN

01
5 MINUTE WINDOW
Front door can only be accessed 5 mins before or after your scheduled tan time.

02
BLUETOOTH CHECK-IN
Make sure that bluetooth is enable on your phone. Open the BB24/7 app and tap 'check in'.

03
TAP TO ENTER
Hold up your phone to the bluetooth reader on the front door to access the studio for your tan.

04
TAN ROOM ACCESS
Head to your numbered tan room and tap your phone on the door's bluetooth reader to open.
ARRIVAL

REMOVE JEWELLERY
Remove your clothing and jewellery and place away from the booth.

BARRIER CREAM
Apply a small amount of the provided barrier cream to any dry areas.

FOOT PROTECTORS
Stick on the provided foot protectors to prevent staining your soles.

HAIR NET
To protect hair from overspray, pop on one of our hair nets.
PREP + PROTECT
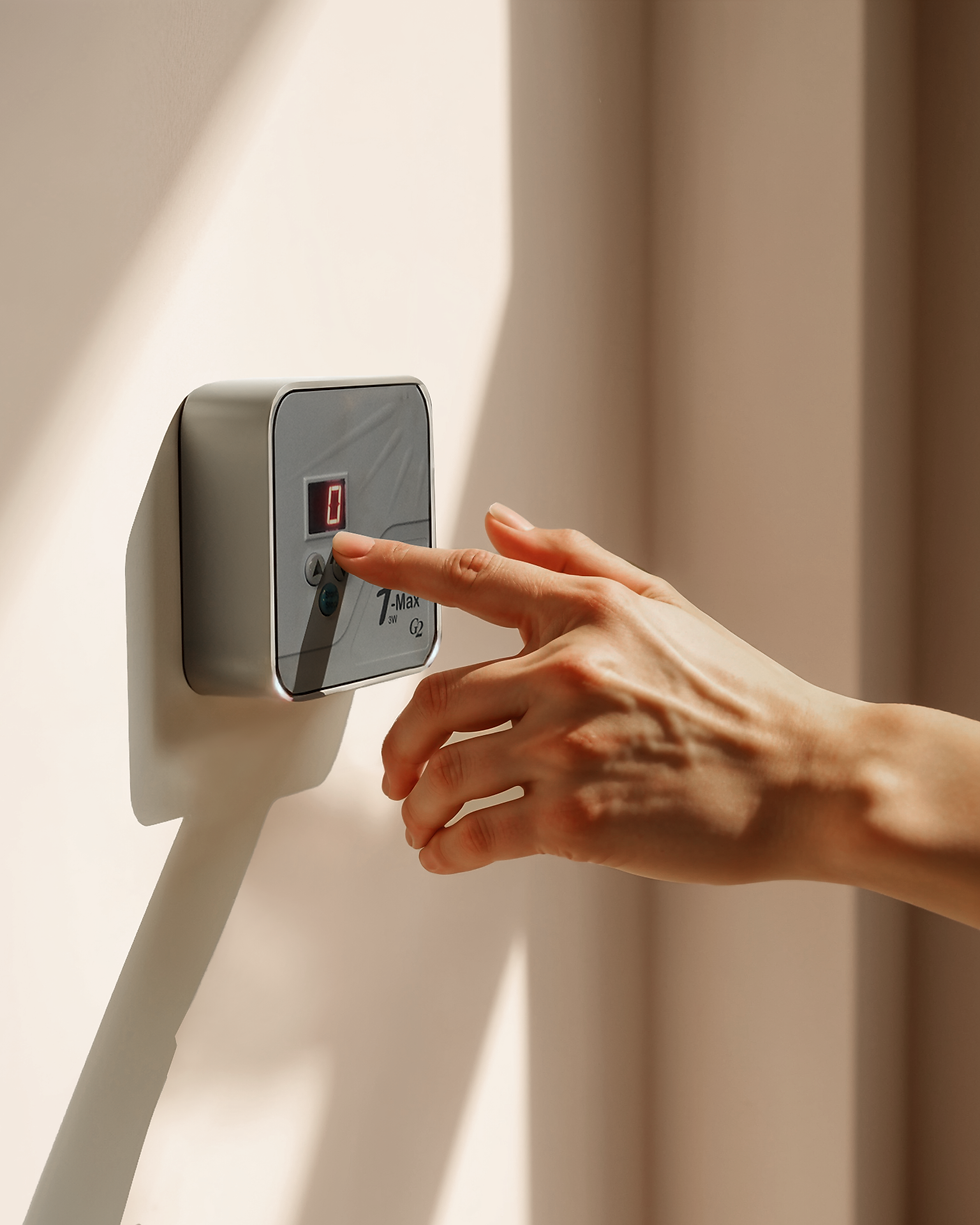
Using the TAN MENU chart (also found in your tan room) input your desired tan number into the grey T-Max box on the wall and press the start button. Don't worry, the booth won't start up until you're ready!


PICK YOUR SHADE
TAN TIME
Safely step into the booth and wave your hand over the flashing button to start.

POSE 1
Follow the voice guide and start with Pose 1, arms out to your sides and hands down.

POSE 2
Turn to your side for Pose 2, with one arm up and the other facing down.

POSE 3
Turn to the opposite side for Pose 3, switching arm positions.

POSE 4
Finally, face the back of the booth for Pose 4, arms out and hands lifting up.

PERFECT
After safely stepping out of the booth. If needed, use your mitt to blend any mistakes.

BAGGY CHIC
Slip into your loose, comfy post-glow outfit and footwear to protect your fresh new tan.

ACTIVATION
After exiting the tan room and studio, it's time to let the colour activation begin!

RINSE
Take your first "RINSE" - a gentle, warm shower, minus the soap - the tan is still developing!

HYDRATE +
After a few more hours, shower and hydrate as normal. Keep up the sunscreen too!
POST-GLOW
I CAME. I SAW. I TANNED.
You did it! Congratulations and welcome to the Glow-Show!
Thanks so much for stopping by, we hope you enjoyed your experience and will tan with us again soon! This is just the beginning of your bronzed adventures, you’ve unlocked the secret to the most flawless and effortless glow in town, ain’t nobody gonna stop you now!
Continue showing your skin some love by keeping up with the hydration and sun protection and celebrate your tanning journey with other glowseekers on socials with the hashtag #bebronzebesties
Bronzefully Yours,
The Be Bronze 24/7 Crew
In need of more info? Swing by our FAQS page!
GLOW GUIDE
PRE-GLOW
BOOKING
ARRIVAL
TAN TIME
POST-GLOW
THE LIGHT GUIDE


HYDRATE!
Drink plenty of water before your session to keep your skin and body well-hydrated. This is key to help amplify the rejuvenating effects of the red light.

CLEAN SLATE
Shower or cleanse your skin before your session to remove any oils, lotions, or makeup. A clean surface ensures the light penetrates effectively.

DITCH THE SPF
Avoid applying sunscreen or products with UV blockers before your session. These can hinder the red light’s ability to reach your skin effectively.

COMFORT IS KEY
Wear loose, comfortable clothing that’s easy to remove. Red light therapy is most effective when more skin is exposed, so consider a minimal outfit or swimwear.

TIME YOUR SKINCARE
Save active skincare products like retinol or acids for after your session. The red light helps skin repair, so let it do its magic without interference.

CONSISTANCY
Red light therapy works best when you stick to a regular schedule. Aim for consistent times and intervals to help your body adapt and maximize the benefits.


the
GLOW GUIDE
PRE-GLOW
BOOKING
ARRIVAL
TAN TIME
POST-GLOW
BUFF + POLISH
Exfoliate 24 hours before your tan to remove dead skin, old tan, or any lingering mistakes. Skip oily scrubs — they can block absorption and leave uneven patches.
LOTION OFF!
Moisturiser might be your bestie every other day, but not today. Ditch the lotion before your session so your skin absorbs that bronzed goodness evenly.
BARE-FACED
Remove makeup to avoid patchiness and give your face a flawless, even tan. Plus, with your post-tan glow, you may not need foundation for a few days — win, win!
Smooth Operator
Shave, wax, zap or pluck at least 24 hours before your tan. Hair removal too close to your session can leave your pores open, which may lead to a slightly uneven tan.
Perfume Pause
No perfume, no deodorant. The chemicals in these products can react with tanning formulas, leaving streaks or discolouration — A temporary sacrifice for a flawless glow!
Baggy Chic
Wear loose, breathable clothing that won’t cling or rub. Skip tight shoes too, thongs or slides are the way to go to avoid any awkward lines or pressure marks.
PRE-TAN CHECKLIST
01
DOWNLOAD
Download the Be Bronze 24/7 app on your phone.
02
EXPLORE
Register and explore our passes and plans.
03
BOOK
Easily schedule your tanning session 24/7.
TAP TO TAN
5 MINUTE WINDOW
The entrance door can only be accessed 5 MINUTES before or after your scheduled tan time.
BLUETOOTH CHECK-IN
Make sure that bluetooth is enable on your phone. Open the BB24/7 app and tap 'check in'.
TAP TO ENTER
Hold up your phone to the bluetooth reader on the front door to access the studio for your tan.
TAN ROOM ACCESS
Head to your numbered tan room and tap your phone on the door's bluetooth reader to open.
ARRIVAL
REMOVE JEWELLERY
Remove your clothing and jewellery and place away from the booth.
BARRIER CREAM
Apply a small amount of the provided barrier cream to any dry areas.
FEET PROTECTORS
Stick on the provided foot protectors to prevent staining your soles.
HAIR NET
To protect hair from overspray, pop on one of our disposable hair nets.
PREP + PROTECT
PICK YOUR SHADE
Using the TAN MENU chart below
(also found in your tan room)
choose your colour and depth combination
Next input the corresponding tan number into the grey T-Max box located on the wall and press the start button.
Don't worry, the booth won't
start up until you're ready!
TAN TIME

Safely step into the booth, then wave your hand over the flashing button to start.
INTO THE BOOTH
Follow the voice guide and start with Pose 1, arms out to your sides and hands down.
POSE 1
Turn to your side for Pose 2, with one arm up and the other facing down.
POSE 2
Turn to the opposite side for Pose 3, switching arm positions.
POSE 3
Finally, face the back of the booth for Pose 4, arms out and hands lifting up to avoid palms staining.
POSE 4
POST-GLOW

PERFECT
After safely stepping out of the booth. If needed, use your mitt to blend any mistakes.
BAGGY CHIC
Slip into your loose, comfy post-glow outfit and footwear to protect your fresh new tan.
ACTIVATION
After exiting the tan room and studio, it's time to let the colour activation begin!
RINSE
"RINSE" time - a gentle, warm shower, minus the soap - the tan is still developing!
HYDRATE
After a few more hours, shower and hydrate as normal. Keep up the sunscreen too!
I CAME.
I SAW.
I TANNED.
You did it! Congratulations
and welcome to the Glow-Show!
Thanks so much for stopping by, we hope you enjoyed your experience and will tan with us again soon! This is just the beginning of your bronzed adventures, you’ve unlocked the secret to the most flawless and effortless glow in town, ain’t nobody gonna stop you now!
Continue showing your skin some love by keeping up with the hydration and sun protection and celebrate your tanning journey with other glowseekers on socials with the hashtag #bebronzebesties
Bronzefully Yours,
The Be Bronze 24/7 Crew
In need of more info?
Swing by our FAQS page!